Hi Everyone!
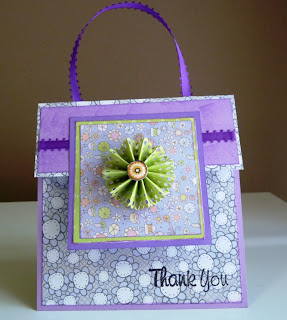
I made this cute little gift bag a few weeks ago and have just now gotten around to posting it! (Story of my life- procrastination and always running late do NOT mix!)
So simple to make!
I used a 5" wide brown paper bag as a base.
To cover the bag, I cut 2 pieces of patterned cardstock to 5"x5" (one for each side of the bag). I layered another piece of cardstock on top- this one cut to 4.25"x4.25".
I folded the top 2" of the bag over (as a flap to cover the opening) and cut 1 piece of cardstock to 5"x2" and cut another piece .25" smaller to layer on top.
The square flap base is cut at 3". I added 2 layers on top of it, each cut .25" smaller than the one before.
The rosette was super simple to make too!
Here's s quick video to show you how to make one. (Courtesy of splitcoaststampers.com)
To assemble the bag:
Glue all appropriate layers together.
Attach the 5" pieces directly to the front and back of the bag.
Before attaching the 5"x2" to the folded bag, cut a piece of ribbon 6" long (for a handle) and attach each end to the 2" folded flap of the paper bag--then attach the cardstock layers over the glued ribbon ends.
Attach the Rosette to the 3" square, then attach the top half of the square to folded flap.
Stamp a sentiment or add any other embellishments as desired.
You could make any size bag you'd like by adjusting the cut paper sizes accordingly.
Thanks for stopping by!


Nice card...............................hehe! Thanks for making me laugh the other day! I'm glad I'm not the only one that can't stand that! Your altered bag is beautiful! I love the different patterns you used! These are so much fun to make!
ReplyDeleteGreat job on your bag. I love making these also, but you just gave me a new idea. Thanks
ReplyDeleteHugs
Brenda
I really like your altered bag. Great job and I love the colors..thanks for sharing!
ReplyDeleteSherrie K
http://sherriescraps.blogspot.com
Beautiful! Love quick and easy! Great job!
ReplyDeleteSooo cute and creative!! I am totally going to copy and paste this for a future idea I LOVE IT. Thank you for the step by step instructions!!!
ReplyDeleteSuper cute!
ReplyDeleteLove it. It's so pretty and creative. It just makes us feel good to give something that is entirely handmade. Great job!
ReplyDeleteI love his! What a great idea! No more buying gift bags!! Hugs! Dina
ReplyDeletethis is so super cute! i wish i would've seen this earlier today as i needed a gift bag to hold a dvd gift. i'll be sure to make a mental note of it for next time!
ReplyDeletethanks for the sweet comment you left on my blog. I'm now your newest follower!
This is the cutest bag! Thanks for the inspiration I have lots of little plain bags laying around, so I will have to try one of these! TFS
ReplyDeleteCindy Porter http://cardcrazeeme53.blogspot.com/
Beautiful! Who would guess it started its life as an ordinary brown paper bag? It has such pizzazz now! LOL. I really love the paper combination you used.
ReplyDeleteKelly
http://kellyscraftylife.blogspot.com